Showing posts with label how. Show all posts
Showing posts with label how. Show all posts
Friday, March 1, 2013
KM 2550 Error Code C6000
Try this to reset:
First open top cover then turn on power.
press system menu/counter
arrow down to service
press and hold start, # then enter keys
arrow down to maintenance
press enter
arrow down to Sim 163
press enter
select execute
press enter
turn off power then back on
its cause fuser problem.
ReadMore
First open top cover then turn on power.
press system menu/counter
arrow down to service
press and hold start, # then enter keys
arrow down to maintenance
press enter
arrow down to Sim 163
press enter
select execute
press enter
turn off power then back on
its cause fuser problem.

Printer Problems How to fix them
In this article Im going to explain common printer problems and their solutions. Before we go into the details, following advance checks must be made. Check to see if:
- The power supply voltage meets the specification.
- The power supply is properly grounded
- The printer shares the power supply with any other machine that draws large current intermittently (air conditioner, elevator etc).
- The installation site is environmentally appropriate: high temperature, high humidity, direct sunlight, ventilation, etc.
- Levelness of the installation site.
- Correct paper is being used for printing.
- The units, parts, and supplies used for printing (developer, PC drum, etc.) are properly replenished and replaced when they reach the end of their useful service life.
- Toner is not running out.
- Hardware Problems
- Connectivity Problems
To determine the problem type, print “status page” from the printer control panel. If it prints without any problem then problem is in the hardware.
Hardware Related Problems.
Below is a list of common hardware problems. Printer troubleshooting, especially hardware repairing should always be done by a professional, however simple problems can be solved with very little efforts by end-user.
 Incompletely printed characters on laser-printed transparencies be corrected by adjusting the print density. Always use recommended printing material to obtain good print quality.
 Ghost images appear on the printed page because of bad cleaning blade or improper charging of the drum unit. Ghost images appear on the next printed page if cleaning blade does not clean the drum surface. Drum/ photoconductor is very sensitive to light, so special care should taken while pulling it out.
 Most common cause of paper creases is damp paper. If the creases are noticeable, replace the paper, if problem persists check all the potential causes of misfeeds, paper jams and skewed prints. No hardware solution exists for this problem. This is simply a side effect of the process.
 A broken charging unit causes a totally black page print. Try removing and reinstalling the print cartridge or photoconductor unit, the electrical contacts between the removable unit and the main part of the printer may not be connecting properly, otherwise replace the print cartridge/photoconductor unit with a new one.
  If spots appear at regular intervals on the printout, the printer’s drum may be damaged or toner is stuck onto the fuser rollers. Try wiping off the fuser rollers. Check the drum for damage. If drum is damaged, you must get a new toner cartridge.
 If you find you have white stripes throughout the printout, then the transfer corona wire is most likely the problem. There may be a problem getting the charge to the paper, resulting in toner missing on the page in areas. Otherwise there is blockage in the developer unit preventing a small area on the developer roller from receiving toner. Clean the path between the developing roller and the “doctor blade” with the corner of a sheet of paper if developing unit is user removable part, but this is not possible on printers using print cartridges.
- Incomplete Characters
 Incompletely printed characters on laser-printed transparencies be corrected by adjusting the print density. Always use recommended printing material to obtain good print quality.
- Ghosting
 Ghost images appear on the printed page because of bad cleaning blade or improper charging of the drum unit. Ghost images appear on the next printed page if cleaning blade does not clean the drum surface. Drum/ photoconductor is very sensitive to light, so special care should taken while pulling it out.
- Creased Pages
 Most common cause of paper creases is damp paper. If the creases are noticeable, replace the paper, if problem persists check all the potential causes of misfeeds, paper jams and skewed prints. No hardware solution exists for this problem. This is simply a side effect of the process.
- Black Pages
 A broken charging unit causes a totally black page print. Try removing and reinstalling the print cartridge or photoconductor unit, the electrical contacts between the removable unit and the main part of the printer may not be connecting properly, otherwise replace the print cartridge/photoconductor unit with a new one.
 - Spotty Print
 If spots appear at regular intervals on the printout, the printer’s drum may be damaged or toner is stuck onto the fuser rollers. Try wiping off the fuser rollers. Check the drum for damage. If drum is damaged, you must get a new toner cartridge.
- Vertical White Lines
 If you find you have white stripes throughout the printout, then the transfer corona wire is most likely the problem. There may be a problem getting the charge to the paper, resulting in toner missing on the page in areas. Otherwise there is blockage in the developer unit preventing a small area on the developer roller from receiving toner. Clean the path between the developing roller and the “doctor blade” with the corner of a sheet of paper if developing unit is user removable part, but this is not possible on printers using print cartridges.
 - Paper Jams
A misfeed occurs if the printer fails to feed a sheet of paper from the paper feeder. Misfeeds are generally caused by paper which is unsuitable for the printer, either because it is too light, too heavy, or too smooth, however misfeeds do occur with the correct paper. Old or dirty feeding rollers may cause misfeeds. Clean the feeding roller rubber with water and cloth.
- Garbled or Corrupted output
If you experience corrupted output, it is possible that the driver has gone corrupt or that you have wrong driver installed. One of the best ways to find out if you have a bad driver is to print a test page. To print a test page go to the "Control panel" in Windows, open "Printers and Faxes", Right click the printer, choose properties, and click "Print test page". If test page is not printed correctly than you should try to reinstall the driver.
- Fuzzy Print
Low quality or dump paper may effects sharpness of the printed image or the characters. The problem is not the printer, but the paper. Always store paper in a dry place to avoid this problem. Avoid paper that is too rough too smooth. Paper that’s too rough interferes with fusing of characters and their initial definition. If the paper is too smooth (like some coated papers, for example), it might feed improperly, causing distorted or overwritten characters.
- Blank Printouts
There are two main caused of blank printouts in inkjet printers:
- Low ink level
- Clogged nozzle of the ink cartridges
If the ink is at an acceptable level, the nozzles have probably become clogged. To unclog the nozzle, dip a cotton swab in denatured alcohol and gently wipe away any dried ink. In laser printers a broken corotron wire may cause no print out.
- Light Ghosting and Dark Ghosting
A variety of problems can cause both light and dark ghosting, but the most common source of light ghosting is developer starvation. If you ask a laser printer to print an extremely dark or complex image, it can use up so much toner that the toner cartridge won’t be able to charge enough toner to print the next image. The proper solution is to use less toner by using low resolution, changing the pattern and printing a completely blank page prior to the page with the ghosting image.
- Confetti Printouts
Printouts with ink speckles, or confetti, always indicate an ink problem. Over time, ink can escape into the body of an inkjet printer, eventually finding its way onto subsequent printouts. To fix or prevent speckling, clean the insides of the printer with a damp cloth. Wrong Colors in Printouts Sometimes, a inkjet printers produce printing using the wrong color. Low ink may cause it, it the color cartridge are full than try to clean the nozzles with a cotton swab dipped in denatured alcohol.
Smudges on Printouts
Smudges on printouts are most often caused by the user touching the printout before the ink has dried. So be aware of it. You may also face this if printer is dirty or nozzles are worn-out. You must replace the worn-out nozzles because they cant be repaired.
Smudges on Printouts
Smudges on printouts are most often caused by the user touching the printout before the ink has dried. So be aware of it. You may also face this if printer is dirty or nozzles are worn-out. You must replace the worn-out nozzles because they cant be repaired.
Connectivity Related Problems:
Before troubleshooting connectivity related problems, make sure that
- Your printer is the selected printer in the Print dialog.
- Select it from the Printer pop-up menu if you do not find it listed.
- Take care that your operating software is up-to-date.
- Ensure that you are using the manufacturers latest printer driver.
- Try deleting and then re-adding your printer through the Printer Setup Utility.
- Check the cable connections, line voltage etc.
- The printer is "Online".
- Wrong paper size selection in printer driver may also be a cause of print failure.
- Printer and PC network cards should be able to communicate with each other to complete a print job. Check connectivity between both printer and PC. (see How to).
- Spooling function saves the print job to hard disk of the printer in a queue eliminating delay in print jobs. Check the properties of the printer and ensure that spooling is enables.
Monday, February 25, 2013
How to Reset Printers Canon MP Series
How to Reset Printers Canon MP140, MP160, MP180, MP210, MP220, MP460, MP470, MP500, MP510, MP530, MP600, MP610, MP800, MP820, MP810, MP830, MP960, MP970
ReadMore
- Start with printer off
- Press and hold resume Button (triangle in the circle) and click “Power” button. green led should be on
- While holding the Power button, release the Resume Button.
- Without releasing the Power Button, click “Resume” button for two times and release Both Buttons.
- Click “Resume” for four times then soon click “Power” button, to confirm the selected action (reset counter absorber).
- Turn off the printer and turn on again
Sunday, February 24, 2013
How to Reset Epson T13 and ME32 printer

Please follow the steps below to reset the protection counter effectively.
1. Double click Adjprog.exe.
2. Click “Accept” button.
3. Click "Select" button. and choose your printer model then click "OK"
4. Click “Particular adjustment mode” button.
5. Select on “Waste ink pad counter” and click “OK” button.
6. Check on Main pad counter and click on “Initialization” button and the program will reset the protection counter.
7. Turn off the printer as a program instructed then turn on again.
8. Click “Finish” button. and its done!
Here the screenshot of software resetter Epson T13, T1100 and TX121


Downloads
Wednesday, February 20, 2013
How to Reset Canon i850 i950 Waste Ink
Follow the step below to to reset Canon i850, i950, Waste Ink
presses – light color – function
ReadMore
- Start with the printer OFF
- Hold down RESUME and then hold down POWER
- Release RESUME
- Press RESUME twice, then release POWER
- Let green light blink until printer is done futzing
presses – light color – function
| Number of presses | light color | function |
| 0 presses | green | Test print (or exit service mode on i960) |
| 1 press | orange | EEPROM info print (plus grid nozzle diagnostic on i960) |
| 2 presses | green | EEPROM initialize |
| 3 presses | orange | Reset waste ink counter |
Tuesday, February 19, 2013
How to Reset canon i320
Reset canon i320.! Ints easy you is only requiring two steps, that is reset manual for service mode and reset using software resetter for permanent reset.
Following this steps to reset printer canon i320
Step 1 : Reset Manual for service mode
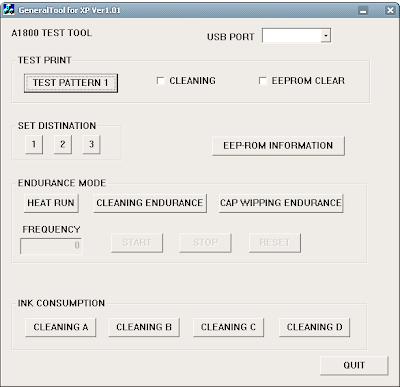
Step 2 : reset using Software resetter i320 for Permanent reset
ReadMore
Following this steps to reset printer canon i320
Step 1 : Reset Manual for service mode
- Discharging all cables (power cable and USB cable ) at the printer
- Open front cover of printer and then press and hold the power button.
- While holed power button, Connect the power cable to power source .
- Close printer cover, then release power button.

Step 2 : reset using Software resetter i320 for Permanent reset
- Download software resetter for canon i320. After finishing download the file, extrac this file by click i320.exe file.
- Now Reconnect the USB printer cable to computer.
- Run General Tools software resetter for Canon printers i320 by clicking generaltool.exe file
- Select where your printer installed in the USB PORT
- Choose SET DESTINATION 1 to reset the printer and the printer should be reset.
Monday, February 18, 2013
How to Reset Canon Pixma iP6000 iP8500
Manual Reset for Canon Pixma iP 6000, iP 8500
ReadMore
- Turn off the printer.
- Hold Resume button click POWER.
- Hold button RESUME release POWER.
- Then press the button RESUME again .
- Release all the buttons.
- Led Indicator in green and stay green.
- Click RESUME button 4 times , if you want to make another transaction. Look at the table below :
- Orange – Service test print 1 times – Orange – Service test print
- Green – EEPROM information print 2 times – Green – EEPROM information print
- Orange – EEPROM initialization 3 times – Orange – EEPROM initialization
- Green – Waste ink counter setting 4 time – Green – Waste ink counter setting
- Orange – Destination setting (Press Power > Press Resume 3x) 5 times – Orange – Destination setting (Press Power> Press Resume 3x)
- Green – Print head deep cleaning 6 times – Green – Print head deep cleaning
- Orange, Green, Orange – Return to menu selection 11-13 times – Orange, Green, Orange – Return to menu selection
- Green – Left margin correction 14 times – Green – Left margin correction
- Turn off the printer POWER button.
Sunday, February 17, 2013
How to Reset Canon Pixma MP520
Reset procedure for Canon Pixma MP520, posting by BilBg (bulgaria) in fixyourownprinter forum, procedure for resetting the Canon Pixma MP520 with button combinations. Some users in this forum which have tried this method (canon MP520 reset methode) say this method work on Canon MP520.
Here Procedure Resetting Canon Pixma MP520 (Picture by BilBg):
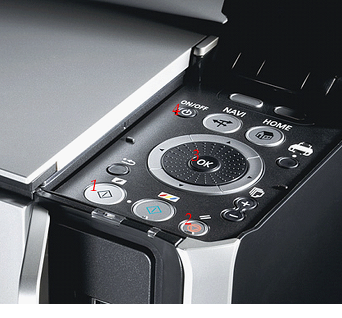
ReadMore
Here Procedure Resetting Canon Pixma MP520 (Picture by BilBg):

- Switch the printer OFF
- Press buttons 1 + 2 + 3 and 4 (simultaneously using four fingers)
- Keep pressing this four buttons for 10 seconds
- Release the On/Off button (number 4) (Keeping pressing the others)
- After a few seconds (when the printer go ON) you can release buttons 1, 2, 3
- Maybe step “c)” is not needed
- This procedure was used when I refilled the Black cartridge – try using the ColorCopy button instead of BlackCopy button (number 1) if you refill Color cartridge.Maybe there is no need for all the four buttons – you can try 1 + 4, 2 + 4 or 3 + 4. (or 1+2+4, 1+3+4, 2+3+4)
this is step you can try how to reset waste ink full canon on Canon MP190
this is step you can try how to reset waste ink full canon on Canon MP190
1) Enter SERVICE MODE. By pressing Menu Copy Scan Copy Copy
2) Select TEST MODE.
3) Select [8] PRINTER TEST in TEST MODE.
4) Select 3. [EEPROM CLEAR].
5) Select 0. [INK COUNT].
6) Press the [Set] key.
7) Press the [Stop/Reset] key (returning to the state of
3)), and then press the [ON/OFF] key
happy resetter and enjoy
ReadMore
1) Enter SERVICE MODE. By pressing Menu Copy Scan Copy Copy
2) Select TEST MODE.
3) Select [8] PRINTER TEST in TEST MODE.
4) Select 3. [EEPROM CLEAR].
5) Select 0. [INK COUNT].
6) Press the [Set] key.
7) Press the [Stop/Reset] key (returning to the state of
3)), and then press the [ON/OFF] key
happy resetter and enjoy
Friday, February 8, 2013
How to Share a Printer
Printer sharing is a very useful resource on your home or business network. Printer Sharing enables you to use a single printer over the network, i.e. from a number of computers. Many offices use the Sharing of Printers to make operation more economic.
I will show you simple steps to do this. Here are the things you must do to have that local Printer Shared on the Network:
First open the Control Panel and open the Printers and Faxes by double-clicking on the corresponding icon in Control Panel. Alternatively, you can click on Printers And Faxes on the Start Menu. In the Printers And Faxes windows that has appeared, right click on the printer you want to share and click on Sharing. But make sure that you have enabled the File and Printer Sharing for Microsoft Networks on network cards properties. In the window that appears, click the Sharing tab and select the Radio-Button named Share This Printer. Assign a share name to the computer, say HP Printer and Printers; this is the name with which your printer will be known on the network. Click OK. Now, assuming this computer do not have a local printer and would like to print a document. You can print a document from a shared printer, here is how:
Go To:
1. Control Panel
2. Click on PRINTERS and OTHER HARDWARE
3. Click on PRINTERS and FAXES
5. Click on ADD A PRINTER
6. The ADD A PRINTER WIZARD will then pop out, just click next
7. Click on A NETWORK PRINTER or A PRINTER ATTACHED TO ANOTHER
COMPUTER
8. You can either let the computer browse for a printer available in the
network or you can choose the second option if you know the name of the
printer available in the network.
ReadMore
I will show you simple steps to do this. Here are the things you must do to have that local Printer Shared on the Network:
Go To:
1. Control Panel
2. Click on PRINTERS and OTHER HARDWARE
3. Click on PRINTERS and FAXES
5. Click on ADD A PRINTER
6. The ADD A PRINTER WIZARD will then pop out, just click next
7. Click on A NETWORK PRINTER or A PRINTER ATTACHED TO ANOTHER
COMPUTER
8. You can either let the computer browse for a printer available in the
network or you can choose the second option if you know the name of the
printer available in the network.
Thursday, February 7, 2013
How to Reset Printer Canon Pixma MP450
Here manual reset procedure for Printer Canon Pixma MP450 :
ReadMore
- Turn off the Printers .
- Hold button Resume/Cancel (red triangle in the circle), click on POWER – an indicator light green.
- Release the button Resume / Cancel keeping POWER.
- Click Resume/Cancel 2 times, keeping POWER, and then release all the buttons.
- When the indicator recorded GREEN – click Resume / Cancel 4 times!
- Turn off the Canon Pixma MP450 Printers POWER button.
Subscribe to:
Posts (Atom)