Friday, March 1, 2013
KM 2550 Error Code C6000
First open top cover then turn on power.
press system menu/counter
arrow down to service
press and hold start, # then enter keys
arrow down to maintenance
press enter
arrow down to Sim 163
press enter
select execute
press enter
turn off power then back on
its cause fuser problem.

Thursday, February 28, 2013
HP Laserjet Error Codes 13 6 PAPER JAM CHECK REAR DOOR
2. Replace any defective sensors or flags.
Tuesday, February 26, 2013
Toshiba Printer Error Messages
This error means that the printer memory is full. You must call service center to resolve this issue.
Too many jogs of Private print and Department code print are stored in HDD. Perform the jobs or delete them.
Someone has cancelled the print job. Try to print it again.
Printing was interrupted by power failure. Check the power source and try to resent the print job.
Above mentioned codes are taken from Toshiba e-studio 3511/4511 user manual but should be valid for other models.
Led Error kode IP Series

Led Error code for Canon IP1300, IP1700, IP1200, IP1880, IP1980 Led Error code for Canon IP1300, IP1700, IP1200, IP1880, IP1980
Having problem with Canon IP1300, IP1700, IP1200, IP1880, IP1980. Sign that looked to be only led blinking. Following some solutions problem of printer that marked with led blinking.
3x Orange 1x green
Problem : any problem with printer mechanics
Solution: If you don’t have knowledge about printer mechanic, will better if bring the printer to Canon service center.
4x orange 1x green
Problem printer absorber full
Solution: Reset the printer using generaltools or software resetter. If not work using reset manual. Each printers having different set of manual reset
5x orange 1x green
Problem: Black or Color cartridge trouble.
Note: problem is usually caused many matters, for example chips error, conector is dirty, etc.
7x orange 1x green
Problem: Black or Color cartridge trouble.
Note: problem is usually caused many matters, for example chips error, conector is dirty, etc.
8x orange 1x green
Problem printer absorber full (Waste Ink Pad Full)
Solution: Reset the printer using generaltools or software resetter. If not work using reset manual. Each printers having different set of manual reset
15x orange 1x green
Problem: Black or Color cartridge trouble.
Sunday, February 24, 2013
HP Printer Error Codes
Here is a list of common error codes along with troubleshooting tips for HP LaserJet printers.
Error code 02: Warm up issues
Error code 02 indicates that the I/O cable is bad or hooked up incorrectly and/or there is communication problem between computer and printer. Other causes are bad D.C controller, badFuser Assy or bad D.C power supply.
This means that your HP LaserJet is most likely short of paper. Check to see if the sensor arm of the paper tray is damaged or caught somewhere. Check if the tray is empty of paper. It could also be that the paper cassette is missing or the PS2 flag is damaged.
Error code 14: Absence of toner cart
Error code 14 indicates that the toner cartridge is either not properly seated or installed. It could also mean the sensitivity tabs are missing or that the toner cartridge itself is of bad quality. Make sure to check on the right hand tabs of the toner cartridge and that the switch actuator is not bent.
ERROR CODE 16: TONER LOW
Error code 16 indicates that the toner is low or uneven in the cartridge. Shake the toner well. Check the toner cartridge contact point, if necessary clean them with a blower brush. Defective main control board or high voltage power supply may also be the cause of this code.
Error code 22: Configuration error
These error codes are typically associated with improper configuration for the computer or the printer. Make sure the I/O cable isnt damaged. Check if the I/O port on the printer is damaged or not. Also check the EIO card inside slot X of your HP LaserJet printer. Check to see if it has overflowed.
ERROR CODE 24: JOB MEMORY FULL
This code shows that printer job memory is full. This may happen while printing a complex print job. If you have regular complex printing jobs than it is better to increase the memory. Check the specification of you printer to confirm that it support additional memory.
Error code 30: PS error
PS errors refer to a postscript firmware problem. For this you will need to get a new firmware chip for your HP LaserJet to function normally again.
Error code 40: Transfer error
This usually means that there is a disconnection between data transferring from your PC to your HP LaserJet printer. However, it can be rectified if you check on the MIO card. It should have no defects.
ERROR CODE 49. A COMMUNICATION OR CRITICAL FIRMWARE ERROR
This is a communication error code with the application that is being used. Go back to a different software program and see if a job will print. If message persists turn printer off then on. If message still there when the network cable is disconnected. Up grade firmware in jetdirect card and the formatter board.
Error code 52: Improper scanner speed
This error code implies that the HP LaserJet scanner is having faulty speeds. Check if the scanner motor is damaged and also check if the cable assembly is faulty or not. Sometimes this could be temporary as the scanner maybe facing startup issues.
ERROR CODE 68 - ERROR IN NVRAM, SERVICE ERROR NVRAM FULL
Possible Causes: This is temporary error code. If turning the power on and Off does solve it the formatter board may be defective.
ERROR CODE 69 - DUPLEXER ERROR HAS OCCURRED
Temporary duplexer error. Reseat duplexer and perform a service test. If problem persists perform a paper path test.
Error codes 70 and 71: damaged MIO card
This indicates that the MIO card also called SIMMS is faulty or damaged. Either the SIMM slot or the SIMM itself is not compatible with your HP LaserJet printer. That means you will need to get a new SIMM which is compatible.
ERROR CODE 80 - DEFECTIVE NETWORK CARD, OR FORMATTER BOARD.
Possible Causes: Improper MIO connection, replace the network cable.
Defective MIO / Network card
Replace the formatter board.
HP Laserjet Error Codes 13 1 PAPER JAM OPEN INPUT TRAYS
how to solve
1. Ensure that paper trays are loaded and adjusted properly so media can feed from the tray. It might be necessary to reduce the stack height of media in the tray. 2. Check the input area for obstructions such as media in the path. Also check to see if the registration assembly damaged or unseated. 3. Replace any defective sensors or flags. 4. Verify the media meets the specifications. 5. Check the pickup feed and separation rollers for unusual wear. Replace as needed. 6. Rotate the media in the input tray by 180° and/or turn it over
Tuesday, February 19, 2013
Canon PIXMA MP800 Error 6A00
1. With the power off, open the top cover.
2. Turn the power on and as the unit attempts to perform the initial test cycle, gently pull on the carriage assembly to see if it will move to the left. If you get no response. Turn the power off.
3. Now, turn the power on and gentley push on the carriage assembly to the right in an attempt to take the pressure of the of carriage and free the jam.
If neither of these work, then you are left with no other choice than to take the printer apart and get at the locking mechanism and free the carriage so it can move away fromt he purge unit and help you to locate the probable jam in the purge unit.
Sunday, February 17, 2013
Error Code 6A00 Canon Pixma iP4300
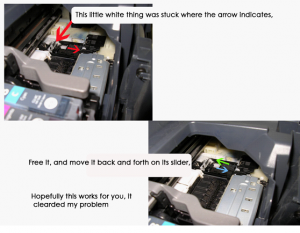 Root Ravine Pixma IP4300 Incorrectness 6A00, the tips from someone in printer installation allow with represent. Solotion failure 6A00 grow intructions in the show.
This methode also activity in Canon iP4200 and some individual says can be misused in Canon MP800(Absolute see image permit with descriptions)
Friday, February 15, 2013
Error Light Epson CX3200 Fixed
2. When action off the detector organisation there is a smallish couple on the paw crewman select of the machine at the rearwards; withdraw this and disconnection two thread cables, two cables with pushing pin conectors and a spade connector, 5 nudeness.
3. Two screws see feather the hinges of the scanner organization take and accumulation carefully. Better off scanner organisation.
4. Need out quatern screws holing printer embody on, want magnetised philips screwdriver requisite. outlet screws meliorate off concealment.
5. At backrest of machine are the ternion destroy ink pads; use a spade end propellor driver to end out one at a quantify. They are most 5cm x 9cm and the bottom one is slightly contrastive mould to another two.
6. Lave them thoroughly with irrigate and then twitch out and dry. I used kitchen churn and then fabric appliance.
7. Put one at a instance tucking in crossroad bits with screwdriver.
8. Replace embody, detector organisation, wires and overcompensate.
9. Insert up machine and switching on. Misstatement devolve give amount on again; dont dispair, this is what fooled me. Ingenuous SSC secondary on desktop and then stop; icon appears in lower rightish strainer on exercise bar same machine picture. Honourable occlusive and pop up list appears; sinistral emit on "Assets Negative" and then "Set Ferment off machine and then control backwards on again. Nonachievement sunlit should go out and you can persuade on.
Thursday, February 14, 2013
Konica Minolta Ineo Develop Error Codes
The most common error code in bizhub/konica minolta/ineo machines is C 2557. This code indicates a problem in toner density measurement. Either toner density sensor is faulty or toner/developer quantity is low in the developing unit.
| Code | Cause |
| C0000 | Main Motor malfunction |
| C0044 | ADF cooling fan failure |
| C0045 | Fusing cooling fan motor malfunction |
| C004E | Power supply cooling fan motor malfunction |
| C0070 | Toner replenishing motor malfunction |
| C0210 | Abnormal image transfer voltage |
| C03FF | Faulty model setting |
| C0500, C0501, C0510 | Fuser Roller low temperature/ Warm-up Failure |
| C0520, C0521 | Hight Fusing Temperature |
| C0650 | Faulty scanner home position sensor |
| C0F32 | Faulty TCR sensor |
| C1300 | Polygon motor malfunction |
| C133B | Communication with option error |
| C0001 | LCT Communication failure |
| C0701 | Manual Paper Size Detection adjustment failure |
| C11B0 | Staple Unit CD Drive problem |
| C11D0 | Crease motor drive failure |
| C2557 | Toner Density sensor problem |
| C2654 | EEPROM with no data is detected |
| C3451, C3452 | Fusing warm-up failure |
| C3751, C3752, | High Fuser Temperature |
| C3851, C3852 | Low Fuser Temperature |
Bizhub C250 Error List
| C2151 | 2nd Image Transfer Roller Separation |
| C2253 | Color PC Drum Motor failure to turn |
| C2254 | Color PC Drum motors turning at abnormal timing |
| C255A | Magenta TCR sensor adjustment failure |
| C3452 | Pressure Roller Thermistor problem |
| C4705 | Image Output time out |
| C4761 | Compression hardware timeout |
| C9402 | Exposure Lamp turning ON at abnormal timing |
| CB113 | FAX Driver Error |
| CC152 | ROM content error upon startup |
Saturday, February 9, 2013
Error E019 on Canon
Error E019 in Canon copiers indicates that waste toner box is full and needs to be cleaned or disposed of. Failure to do so may result in background on printed pages. Canon recommends inspecting waste toner box after certain number of copies has been made (usually, but not necessarily more than 100,000). Be sure to dispose of the waste toner according to the standards imposed by the government concerned. Do not dispose of it into fire to avoid explosion.
Where waste toner case is located?
Location of waste toner case varies in each model. Usually it is located near the developing unit and can be seen easily. While it is difficult to discuss all models here, I’d like to explain Canon IR2200 as an example. You will find a plastic cover on left rear side of this machine. Remove one screw, detach the cover and take out the waste toner box. Dispose of the waste toner collecting inside the waste toner case. Clean both inside and outside of the waste toner case with alcohol. Don’t forget to clean the neck of the box because the waste toner might block the toner sensor path. Now fit the waste toner case back in the machine and mount the waste toner case cover with a screw.
Other Causes of Error E019
A faulty waste toner sensor may be another cause of Error E019. To confirm, restart the machine with no waste toner case inside. If it still displays E019 then most probably the sensor has gone.
Very rarely, a defective DC controller board PCB also result in E019.
How to reset:
After cleaning the waste toner box, turn the machine off then on to reset E019. If this doesn’t work, follow reset procedure described in this post.
Above mentioned description of E019 is valid for a lot of Canon photocopier models including Imagerunner600, IR1018, IR2018, IR2016, IR3300, IR1019, IR1023, IR2230, IR1024, etc.