Wednesday, March 27, 2013

Dell Inspiron N4020 service guide

Dell Inspiron N4020 service guide repair manual is a maintenance
troubleshooting and instruction owner manual reference used for
maintaining, disassembly, removal, replacement, install and servicing
the Dell Inspiron N4020. It provides comprehensive information on
identifyin features, components, and spare parts troubleshooting
problems and performing assembly and disassembly procedures.

Table
contents of Dell Inspiron N4020 service manual Before You Begin Battery
Hard Drive Optical Drive Module Cover Memory Module(s) Keyboard
Wireless Mini-Card Palm Rest Power Button Board Display Camera
Internal Card With Bluetooth® Wireless Technology System Board
Coin-Cell Battery Thermal Cooling Assembly Processor Module I/O Board
Speakers Battery Latch Assembly Flashing the BIOS. Download Dell
Inspiron N4020 Service Manual here
ReadMore

Saturday, March 23, 2013

Reset for Epson T13 printer 'waste ink pad counter overflow error'

If you're looking for a guide for how to reset epson T13 printer, in this post we share about how to do it. please be sure to note each step because it could happen fault and cause your printer is not working properly

This is guide how to reset epson stylus T13 :
Step 1:Be sure the driver of epson printer T13 must have been installed on your computer.
Step 2:Download Software resetter of Epson T13 first. You can download it here
Note:Date of computers do not need to be changed as previously resetter. T13 reseter normally be considered a virus by antivirus so you should disable antivisrus before downloading.
Step 3:Run the downloaded program of Epson T13 with a double click on "AdjProg.exe".
Step 4:Follow the photo direction below.

Good luck, please share your thoughts here fatherly help other users of Epson T13 printer reset
ReadMore

Friday, March 22, 2013

hp 3055 can't receiving any faxes

Only do this if you get no other resolution. Or you can call
1-800-474-7739 for hp technical support. I just did
ReadMore

Thursday, March 21, 2013

Resetter Canon i850 i950 S600


Start with the printer OFF

1. Hold down RESUME and then hold down POWER
2. Release RESUME
3. Press RESUME twice, then release POWER
4. Let green light blink until printer is done futzing
Select function with RESUME press POWER to execute:
presses - light color - function
Number of presses - light color - function
0 presses - green - Test print (or exit service mode on i960)
1 press - orange - EEPROM info print (plus grid nozzle diagnostic on i960)
2 presses - green - EEPROM initialize
3 presses - orange - Reset waste ink counter
ReadMore

Wednesday, March 20, 2013

Printer Epson Adjustment Program

Bagi anda yang belum mengetahui menggunakan adjustment program buat printer bisa anda baca selengkapnya disini
CARA PENGGUNAAN ADJUSTMENT PROGRAM
Rubah Regional And Language Option dan pada taskbar Regional Option Rubah Standards and Formats menjadi English (United States).

Masukkan CD Adjustment Program For Epson.
Install Program “DATE CRACKER 2000” :
a) Buka Folder “CRACK”
b) Jalankan file SETUP
Setelah SETUP selesai, jalankan program “DATE CRACKER 2000”, maka akan tampil :

Click tombol Add maka akan muncul tampilan seperti ini :

Ketik nama Program, misalkan : Adjustment Program C-58, lalu tekan OK.
Click tombol Browse pada Program “DATE CRACKER 2000” seperti pada tampilan berikut :Maka akan tampak tampilan berikut :
Maka akan tampil icon Adjustment beserta dengan nama programnya
Pilih Icon tersebut dan tekan “Open”.
Kemudian lakukan pengisian tanggal validasi program, misalkan untuk C58 adalah tanggal 2 November 2006, lakukan pengisian MMM(spasi)D(spasi)YYYY. Jadi penulisannya adalah : Nov 2 2006, atau seperti tampak pada tampilan berikut :Arahkan Cursor ke Adjustment Program C-58, lalu tekan Run. Penggunaan selanjutnya langsung dapat langsung membuka program “Date Cracker”.

type Epson C58 setting tanggal Nov 2 2006
Epson C79 Setting tanggal Nov 2 2006
Epson C90 Setting tanggal Jul 24 2007
Epson CX2800 Setting tanggal Nov 2 2006
Epson CX3900 Setting tanggal Nov 2 2006
Epson CX5900 Setting tanggal Nov 2 2006
Epson R270 Setting tanggal Jan 18 2007
Epson R350 Setting tanggal Feb 1 2007
Epson C67 Setting tanggal Mar 1 2006
Epson C87 Setting tanggal Mar 1 2006
Epson R300,R310 Set tgl Mar 1 2006
Epson RX700 Setting tanggal Mar 1 2006
Epson C63-C64 Setting tanggal Mar 1 2006
Epson C41-C46 Setting tanggal Mar 1 2006

APA BILA MENEMUKAN PESAN ERROR MENJALANKAN ADJUSMENT

Delete the folder - C:/Adjustment Programs/ on your PC.
Delete list Adjusment di program Data Cracker 2000
Dan jalankan program kemali sperti prosedur diatas,

TAMPILAN MUKA APLIKASI

——Select Maintenance Option———

HEAD CLEANING
WASTE INK PAD COUNTER
KLIK CHECK
LALU KLICK INITIALIZATION
LALU TURN OFF/RESTART PRINTER ANDA,,
>> Silakan Mencobah
ReadMore

Tuesday, March 19, 2013

Resetter Code Canon BJC 1000 Serie


1. Remove Cartridge
2. Unplug the AC Power Cord
3. Hold down the RESUME button
4. Release RESUME after plugging in the AC Power cord.
5. Press the RESUME once within 5 seconds and release the RESUME .
6. Press and HOLD RESUME for two seconds or more and release it.
7. Press and HOLD RESUME for two seconds or more and release it.
8. Unplug AC Power Cord to set data.
ReadMore

Monday, March 18, 2013

Rset Epson C91 C92


Service Adjustment Program

We have now Epson C91, C92 service adjustment program available for instant download

This programs works on PC under Windows XP only!

To reset waste ink pad counter C91 or C92 printers you have to:
- Run the program
- Choose Particulare Adjustment Mode - Choose Waste Ink Pad Counter
- Press INITIALIZE!
Here it is! The waste ink counter resets to ZERO!

Download Zip file (648 kB) after on-line payment and unzip it by WinZip. Run AdjProg.exe file!

Stylus photo C91,C92 download
ReadMore

Sunday, March 10, 2013

Spooling on Printer

Spooling is a usefull option if you want to print a large amount of
data. This function saves the print jobs to hard disk in a queue before
sending them to the printer. Consider spooling as the traffic
controller of printing—it keeps all the print jobs from trying to print
at the same time.

By default, spooling is enabled in Widows xp.

You can choose two options:

1. start imediate printing

2. Wait until last page is spooled.

An analogy for these choices is the actions you can take in a grocery
store’s cashier line. Let’s say you have an entire cart full of
groceries and the guy behind you has only a few things. Even if you’ve
started loading your groceries onto the belt, as long as the cashier
hasn’t started with your items, you can choose to let the person with
fewer items go before you, or you can make him wait. If the cashier has
already started totaling your groceries, then you don’t have that
choice. Windows XP Professional spooling options allow you to configure
your print environment similarly.

In the Advanced tab, you can leave the Start Printing Immediately option selected, or you can

choose the Start Printing After Last Page Is Spooled option. If you choose the latter option,

a smaller print job that finishes spooling first will print before your print job, even if your

job started spooling before it did. If you specify Start Printing Immediately, the smaller job will

have to wait until your print job is complete.

The other spooling option is Print Directly to the Printer, which bypasses spooling altogether.

This option doesn’t work well in a multiuser environment where multiple print jobs are sent

to the same device. However, it is useful in troubleshooting printer problems. If you can print to

a print device directly, but you can’t print through the spooler, then you know that your spooler

is corrupt or has other problems.

As I described before, when a user prints a document, the print
job creates a temporary file on the disk for the document being
printer. After that the application can be used for other tasks and the
system sends the temporary file to the print device.

In windows, the print spool service s responsible for managing the
print environment. If yo can't delete a print job from the print queue
than you many have a corrupt queue.

This problem may be solved by restarting the print spooler services.Follow these steps to perform the task:

1. Go to Start Menu

2. Control Pannel

3. Performance an maintinance

4. Administrator toools

Actually when you restart the printing spool services, you are going to reboot the printing envoiroment.

Sometimes, you may want to move the printer spooler folder. The folder
location should be changed if you are facing printing problem in
windows and there is no hardware problem. Also if you are running out
of space on drive C, spool directroy should be moved to another
partition. To change the spool dierctory:

1.Start Menu

2. Printer and Faxes

3. Choose file

4. Server properties

5. Click advance tab

6. Enter the path of the new spool folder
ReadMore

Printer classification

Printer classification based on their technology. Typical printer types are:

1. Dot matrix printer

2. Ink-jet printer

3. Laser printer

4. Thermal printer

Dot Matrix Printer

A dot matrix printer or impact matrix printer refers to a type of
computer printer with a print head that runs back and forth on the page
and prints by impact, striking an ink-soaked cloth ribbon against the
paper, much like a typewriter.

Dot-matrix technology uses a series or matrix of pins to create printed
dots arranged to form characters on a piece of paper. The speed at
which a dot-matrix printer prints is measured in the number of
characters it can produce per second. Unlike a type-writer or daisy
wheel printer, letters are drawn out of a dot matrix, and thus, varied
fonts and arbitrary graphics can be produced. Because the printing
involves mechanical pressure, these printers can create carbon copies
and carbonless copies.

The print head mechanism pushes each pin into the ribbon, which then

strikes the paper. The original dot-matrix print heads had 7 pins, while newer,

letter-quality print heads use 24 pins to produce near letter quality
(NLQ) documents. Each pin is driven forward by the power of a tiny
electromagnet or solenoid, either directly or through small levers
(pawls).

Dot-matrix printers are called impact printers because the printing
mechanism physically strikes the page. The continual motion of the pins
through the print head creates a ton of heat, so avoid touching the
print head after printing a handful of pages or more. A hot print head
can give you a nasty burn.

Paper moves through a dot-matrix printer using a tractor-feed
mechanism. Spoked wheels located on each side of the paper feed
mechanism move the paper. The spokes on the outer edges of the wheels
fit into holes on the sides of specially designed continuous form
paper. As the wheels turn, they pull the paper through the printer.

Because impact printers physically strike the page, you can use them to
create multi part forms with ease.Many offices and government agencies
use them for that very reason. Although impact printers have been
replaced in most homes and offices by newer, sexier inkjet and laser
printers , they still retain a substantial portion of the market in
their niches.

Advantages:

1.They can print on multi-part stationary or make carbon copies

2. Low printing cost

3. They can bear environmental conditions.

4. Long life


Disadvantage

1. Noise

2. Low resolution

3. Very limiter Color performance

4. Low speed  

Thermal Printers:

Thermal printers use a thermal ribbon which is soaked with a wax type ink which is melted and then transferred to the paper.

In some thermal printers a thermo sensitive paper is necessary. In this
case the paper passes over a thermal head and the carbon coating turns
black in the heated areas. Thermal printers have low noise, low cast
while they are also compact. They are also known for their low printing
speed and high running cast.

Ink Jet Printers

Ink jet printers spray a very small amount of ink onto
the media. This is done by using a piezoelectric element. When voltage
are applied to the element, in bends and creates a pressure wave to
force out a drop of ink. Ink jet printers have low cast, compact size,
low noise. Their color printing quality is affordable. Some ink jet
printers may require special paper. Usually speed of ink jet printers is
slower than laser printers.

Laser Printers:

Laser printing is the most advance technology. In Laser
printing, a computer sends data to the printer. Printer translates this
data into printable image data. This kind of printers uses xerographic
principle. A laser beam discharges photo sensitive drum. A Latent Image
is created on drum, during development process toner is attracted to the
drum surface and then transferred to the paper.

Laser printing quality is high. These printers have low noise, high
speed while they are more expensive than ink jet or dot matrix printer
and they are generally large in size.
ReadMore

Saturday, March 9, 2013

Dell XPS M1330 User Guide Owners Manual

This Dell XPS M1330 User Guide Owners Manual contains the information you need when installing, setup, setting, configuring, maintenance and troubleshooting, operating instructions the Dell XPS M1330.

Table of contents Dell XPS M1330 Manual
  • About Your Computer
  • Setting Up Your Computer
  • Using the System Setup Program
  • Using the Keyboard and Touch Pad
  • Using the Display
  • Using a Battery
  • Using Multimedia
  • Using ExpressCards
  • Using the Memory Card Reader
  • Setting Up and Using Networks
  • Securing Your Computer
  • Troubleshooting
  • Adding and Replacing Parts
  • Dell™ QuickSet
  • Traveling With Your Computer
  • Getting Help
  • Specifications
  • Appendix
  • Glossary
Download
ReadMore

Resetter Epson R270

Here is a step to Reset waste ink counter on Epson R270

  • Extrac Adjustment Program files youve downloaded
  • Turn the printer
  • Then click RUN AdjProg.exe. for Epson Stylus R270 from the extracted folder
  • Choose Choose a special mode of adjustment
  • Go to interview Then select waste Ink pad counter then click ok
  • Initialization click the button to remove the Waste Ink Pad counter to zero
  • Once you press the Initialize button, you can see the message is complete, so press the OK button
  • To Read Status Press Cons Read, you can see the current counter value.
  • Turn off the printer then turn it on again 5 seconds
  • After you successfully reset, you can also change the date settings back to normal again
Download : Resetter Epson R270
$ : Click
    ReadMore

    Friday, March 8, 2013

    Lexmark Prestige Pro805 User Manual

    This Lexmark Prestige Pro805 User Guide Owners Manual contains the information you need when installing, setup, setting, configuring, maintenance and troubleshooting, operating instructions the Lexmark Prestige Pro805.

    Table of contents Lexmark Prestige Pro805 Manual
    • Safety information
    • About your printer
      Thank
      you for choosing this printer! ~ Minimizing your printer's
      environmental impact ~ Finding information about the printer ~
      Understanding the parts of the printer
    • Ordering and replacing supplies
      Ordering
      ink cartridges ~ Using genuine Lexmark ink cartridges ~ Replacing ink
      cartridges ~ Ordering paper and other supplies ~ Recycling Lexmark
      products
    • Using the printer control panel buttons and menus
      Using
      the printer control panel ~ Understanding the home screen ~ Navigating
      menus using the touch screen ~ Changing the Power Saver timeout ~ Saving
      paper and energy with Eco-Mode ~ Resetting to factory settings
    • Using the printer software
      Minimum
      system requirements ~ Using the Windows printer software ~ Using the
      Macintosh printer software ~ Finding and installing optional software ~
      Updating the printer software (Windows only) ~ Reinstalling the printer
      software
    • Loading paper and original documents
      Loading the
      paper tray ~ Loading envelopes or photo paper ~ Loading various paper
      types ~ Saving paper default settings ~ Loading original documents on
      the scanner glass ~ Loading original documents into the ADF
    • Printing
      Tips
      for printing ~ Printing basic documents ~ Printing specialty documents ~
      Working with photos ~ Printing from a Bluetooth-enabled device ~
      Printing on both sides of the paper (duplexing) ~ Managing print jobs
    • Copying
      Tips
      for copying ~ Making copies ~ Copying photos ~ Copying an ID card ~
      Copying a two-sided document ~ Enlarging or reducing images ~ Adjusting
      copy quality ~ Making a copy lighter or darker ~ Collating copies using
      the printer control panel ~ Repeating an image on one page ~ Copying
      multiple pages on one sheet ~ Making a duplex copy ~ Canceling copy jobs
    • Scanning
      Tips
      for scanning ~ Scanning to a local or network computer ~ Scanning to a
      flash drive or memory card ~ Scanning photos into an editing application
      ~ Scanning documents into an editing application ~ Scanning directly
      to e-mail using the printer software ~ Scanning to a PDF ~ Scanning FAQ ~
      Canceling scan jobs
    • E-mailing
      Setting up the printer to e-mail ~ Creating an e-mail contact list ~ Sending e-mail ~ Canceling an e-mail
    • Networking
      Installing
      the printer on a wireless network ~ Advanced wireless setup ~
      Installing the printer on an Ethernet network ~ Networking FAQ
    • Using SmartSolutions
      What is SmartSolutions? ~ Creating and customizing printer solutions
    • Maintaining the printer
      Maintaining ink cartridges ~ Cleaning the exterior of the printer ~ Cleaning the scanner glass ~ Cleaning the touch screen
    • Troubleshooting
      Before
      you troubleshoot ~ Using the Service Center to solve printer problems ~
      If Troubleshooting does not solve your problem ~ Setup troubleshooting ~
      Jams and misfeeds troubleshooting ~ Print troubleshooting ~ Copy and
      scan troubleshooting ~ E-mail troubleshooting ~ Memory card
      troubleshooting ~ Network troubleshooting
    download Lexmark Prestige Pro805 user manual
    ReadMore

    MX340 User Guide Owners Manual

    This Canon Pixma MX340 User Guide Owners Manual contains the information
    you need when installing, setup, setting, configuring, maintenance and
    troubleshooting, operating instructions the Canon Pixma MX340. This
    user’s guide also contains the Software Section providing you with
    step-by-step instructions for using your Canon Pixma MX340, and how to
    use the supplied software utilities.

    Table of contents Canon Pixma MX340 Manual
    • Check the Included Items
    • Remove the Protective Material
    • Connect the Telephone Line
    • Turn the Power On
    • Install the FINE Cartridges
    • Load Paper
    • Set Up for Fax Reception
    • Select Connection Method
    • Install the Software
    • Set Up a Wireless Connection
    • Use from Additional Computers
    • Try Using the Machine
      Try Copying ~ Print Photos from a Computer ~ Send Faxes
    • Maintenance
    • Specifications
    Download
    ReadMore

    Thursday, March 7, 2013

    LaserJet 1522 mfp Cold reset

    Network configuration (please wait at least five minutes after cold reset!)
    Press Setup button
    Use arrow keys to highlight Reports, then press OK
    Use arrow keys to highlight Network Report, then press OK
    ReadMore

    The Right Way of Doing Head Cleaning


    Have you experienced that your print result has straight line in
    between of your text/image/photo? If yes then your printer’s head is
    clogged. One way to solve this problem is to do head cleaning. However
    there is an interesting trick that you have to follow in order to get
    the best result. This trick is not documented in printer manual. It’s
    based on my experience. The idea is to run head cleaning maximum 3 times
    consecutively and stop if it does not improve.


    Read this guide first before you take any action to your printer.


    1. Perform “Nozzle Check” from printer’s software maintenance menu. See whether you get perfect nozzle pattern.

      Perfect nozzle means you can see all the color without missing lines in the nozzle check result.
    2. Perform “Head Cleaning” if you get missing lines in
      step 1. When the printer is done, it will show a window whether you
      want to print nozzle check pattern again or to stop. (Do not stop in
      this step)
    3. Print “Nozzle Check” again and check whether you
      get perfect nozzle. If you get a perfect nozzle pattern then you stop
      this process. Leave it for 5-10 minutes to let the printer settle down.
      If not, continue to step 4.
    4. Perform “Head Cleaning” again (second time). When it has done continue to step 5. Remember, do not stop in this step.
    5. Print “Nozzle Check” again and check whether you
      get perfect nozzle. If you get a perfect nozzle pattern then you can
      stop this process. If not continue to step 6.
    6. Perform “Head Cleaning” again (third time). When it has done continue to step 7. Do not stop in this step.
    7. Print “Nozzle Check” again and check whether you get perfect nozzle. Read carefully, you have to stop at this step regardless the result of nozzle pattern.

    If you get perfect nozzle pattern then leave it settle down for 5-10 minutes. You can print your document/image afterwards.


    If you are not getting the perfect nozzle then stop here, leave it
    overnight. Turn off your printer. Let the printer settle down. Try to
    perform “Nozzle Check” again tomorrow and repeat the 7 steps described
    above.


    Frequently Questions and Answers (FAQ)


    Why do you limit head cleaning process to maximum 3 times?

    If you perform head cleaning consecutively as describe above, the
    printer will use more and more ink to flush the dried ink inside your
    clogged print-head. Subsequently, the printer will use little ink to
    flush the dried ink and unlikely will solve the problem. Leave it
    overnight is the best method to solve the problem.


    Why does the printer need an overnight to solve the problem?

    When you perform head cleaning, the ink inside the cartridge move
    very fast and create air bubbles inside the cartridge. These air bubbles
    takes time to settle. Leave it overnight is the best method to solve
    the problem. Performing head cleaning again and again after 3 times will
    never solve the problem and you waste a lot of ink.


    What happen if I get the same problem again tomorrow?

    Too bad, your print-head is clogged badly. You can repeat the 7 steps
    above again. I suggest you buy the new cartridge to save your time. If
    you are using compatible cartridge, try another brand.


    Any more question? Just post a comment and don’t forget to choose to receive notification when I post the answer.


    ReadMore

    Reset Waste Ink Pad Counter on Epson L100 Printers


    Almost all establishments have to print documents to the purpose of
    documentary, stored files, references, letter processes, and reports.
    Though, some companies use different kind of high end printers but there
    are some who use obsolete printer models.


    What is WASTE INK PAD?


    There is really one point that we really need to head clean the printer
    and cleaning it for several times made the printer displayed a
    notification that it needs to be resetted because it reached the END of
    service life.


    In my part, i got spilled with inks with the EPSON L100 and i
    don't know why. Here, i have a little bit information because when it
    displayed a error message the printer detected some dumped absorbent pads with
    full of waste ink. That's made me able to conclude that cleaning the
    printer may not be 100% BETTER solution at least you give a try right?
    And so with ME. 


    Steps on HOW TO Reset Waste INK PAD Counter on EPSON L100 Model


    This software is just for L100 model but in my case, i use Epson T13 Resetter Software and it worked perfectly.


    1.  Download FREE Software here: Epson L100 Resetter Software


    2. Open and RUN(you can RUN it as ADMINISTRATOR if you are using VISTA/WINDOWS 7) Adjprog .exe


    3. When you see EPSON Adjustment Program, click on Particular Adjustment Mode


     4. Select and double click to RUN the WASTE INK PAD COUNTER window.


    5. In the waste ink pad counter:


    NOTE : You have to replace waste ink pad if you initialize the protection counter.


    • 1) Click [Check] button to check current protection counter's value.
    • 2) Replace waste ink pad with new one.
    • 3) Click [Initialization] to reset current protection counter to the initial value.


    6. Enjoy cleaning again and continue Printing


    Points of View about the printer, since L100 is better than
    T13(Improvised) and all CHEAP, i would really recommend NOT to use any
    INKJET printers because here you see, i usually do troubleshotting and
    it makes me do a lot of work and time. 


    Whereas on those cartridge printers it seldom have problems but it is
    expensive though. The cost and benefit would rather shows that cartridge
    would have the higher benefits than ink printers.


    ReadMore

    Wednesday, March 6, 2013

    HP OfficeJet user manual

    Table of Contents :

    - HP all-in-one overview

    - Connection information

    - Work with photos

    - Load originals and load paper

    - Use a memory card or PictBridge camera

    - Use the copy features

    - Use the scan features

    - Print from your computer

    - Fax setup

    - HP OfficeJet Maintenance and Troubleshooting

    - Technical Information

    - Index


    Download User Manual Book
    ReadMore

    Message 096: Fatal Error 02 with Oki printers

    096-02 error is a problem with the finisher.

    That's a "tray raise or lowering error


    Solution 1:

    • Check and clean the upper limit switch. 


    Solution 2:

    • Replace the upper limet switch


    Solution 3:

    • Check the shift motor operation and finisher control PCB board. 
    • If the motor has failed, you need to replace it, and perhaps the control PCB too.
    ReadMore

    HP P3005 Formatter card problems

    For those of you trying the homebrew oven methods and heat guns you
    might note that those SMT chips are put in place by robots with a small
    sticky to hold it in place and solder paster on the board and it's run
    through an oven as a whole board and immediately cooled at the end. No
    airflow is used in the ovens as it would fling chip caps and resistors
    all over the place. Well for home repair same applies - the best method
    is a hot air soldering station as you can focus the heat only on the
    contacts and there is such a low flow of air that it won't blow anything
    around. Also too much heat will kill semiconductors besides melting
    plastics as noted. An alternative would be a butane pocket torch that
    has adjustable flame that you can bring down to a low low flame so it
    doesnt blow too hard but delivers heat where it's needed.
    Biggest
    problem with HP is that they are still in business. Once the last of
    the founders passed away the company went to crap and steadily worse
    since, even in the expensive server lines. I was an ASP from early 2000
    till they killed ASPs off that werent promoting them by buying
    outrageous amounts of resellables - since 2006 I havent seen a HP/CPQ
    item I would personally buy for myself so I'm sure not selling them.
    Same with Dell. Acer is my focus now and possibly Gateway and E-Machines
    since Acer bought them up earlier this year (as well as Packard Bell in
    EU) but of course they don't make printers so I'll hang onto the
    machines I have that are of 99 vintage or older.

    I just replaced
    a formatter on a P3005 non-network unit today, same 49.C02 error,
    steadily worse each day and it did have the Toshiba chip under the
    label. Of course it's outside the serials listed and of course HP blows
    it off as out of warranty. Got a refurb from Liberty with the ST chip
    and works fine (so far). Used the magnifier on the SMT Toshiba chip and
    no bad solder joints noted. Used my hot air soldering/desoldering
    station and reflowed the solder all around and put it back in - same
    problem. Flashed the firmware, no change. The Liberty board was put back
    and works fine.

    HP, as mentioned, has turned from the #1 to the
    worst - only way to bring them to their knees and either put them out
    of business, or get them to bring quality back and manufacturing back to
    the US, is to boycott buying their products unless it's a refurbished
    older unit with a good history, even if that means putting a 4Si or 5Si
    into use in an office. Maybe not the fastest but no chips on toners and
    very reliable and cheap to maintain - and lots of spares when it does
    need work. I'm pushing all my regulars to swear off HP as quick as
    possible for new purchases and for most they are fed up with HP anyway
    so it's not hard to convince them.
    ReadMore

    Reset Canon iP 1880

    Repair or Reset Canon iP 1880

    This is how to reset Canon iP 1880 :

    1. Press Resume button and hold for 1 - 2 minutes
    2. Open the cover
    3. Release the catridge and then put them on again
    4. Close The Cover
    5. Turn off the printer
    6. Turn it on again.


    Or you can use IPTool software to reset,

    Step 1 : Manual for service mode 

    1. Unplug power and USB.
    2. Open door and hold power button.
    3. Connect power.
    4. Close door, then release power button.
    5. Open Iptool then klik "Reset Main"

      Download IPTool

    ReadMore

    Canon i550 Service Error 5100 Message

    Gota' Canon S-9000, issuing a "7-blink error code"-
    #1. How do I enter the Service Codes reset area?

    #2. Where can I get a definitions & reset 'menu' for all the error codes on my S-9000?

    Page 2.

    The
    problem started with ink clogs in the printhead. I bought another one
    from Canon (about $65.00 cuts), it went OK for 6 mo. then another clog
    problem - I could see, this was going to get expensive!

    I pulled
    out the old Printhead to do experimental 'brain surgery' on it. I [very
    carefully] unscrewed the (actual) printing head from the bottom of the
    inktank cartridge and carefully lifted it back. There were the (6) Ink
    Ports!

    I litely cleaned (and flushed) all 6 nozzle ports clear
    of all ink residue (plus the strainer ports above), and re-assembled.
    Installed (6) new ink tanks [and waited a 1/2 hour for ink to purge air
    out of head ports].

    Powered-up and of course got the "7" fatal error code blinks and no action from the printhead. "Good Grief"!

    Last question on this run - In removing the actual
    ReadMore

    Tuesday, March 5, 2013

    49.2F9D error HP P3005

    Try this

    1. Power off the printer
    2. Power on the printer and watch for the memory count in the display
    3. When the memory count appears in the display, press and hold the Menu button
    4. When all 3 LED's are on and steady, release the Menu button.
    5. Press and release the Back/Exit button
    6. When you see INITIALIZE DISKS, press and release the Green Tick button
    ReadMore

    Error message Service Req E020 on Epson printers


    This error could appears on these models: EPL-N3000, Aculaser C1100, Aculaser C1900


    Solution 1: “Secondary transfer voltage contact/release problem”

    • Some electric parts can cause the trouble: 
    • Transfer Roller Pressure Solenoid (SL2) 
    • Transfer Roller Pressure Position Detection Sensor (PC7) 
    • Engine Board (PWB-A)  


    Solution 2:

    • The problem come from the fuser. You have to replace it.
    • EPL-N3000: C13S053017BA 
    • Aculaser  C1100: 2090471
    • Aculaser C1900: 2077368
    ReadMore

    Resetter Epson C67

    1. Download shoftware for epson c67
    2. Change your setting PC DATE to Mar 1 2006
    3. Reboot your PC.
    4. UNZIP file C67.rar
    5. RUN AdjProg.exe file. Here is it!

    To reset waste ink counter

    • choose Particular adjustment mode
    • Maintenance
    • Waste ink pad counter
    • Check
    • Initialization
    ReadMore

    reset procedure for EPSON RX500

    Protection counter is the counter for wasted ink; it says to printer how
    much space it has in special tray where all wasted ink are going during
    cleaning procedures. With time it became full (printer just won't print
    in this case) and absorbtion padding must be replaced. After replacing
    the padding You must reset the protection counter to zero in order to
    continue ordinary printing.


    Repair or reset procedure for EPSON RX500:
    Press all following buttons :Power, Load/Eject, Stop, B&W, Color,
    after this printer turns on and you'll see "Init eeprom" on printer screen.
    Press Color button to clear protection counter.

    Alternate. Hold down "clear + setup + on"
    Continue
    to hold the buttons until the printer had powered on, then off again,
    then back on. Once you noticed that the LCD had flashed a blank screen,
    let go of the 3 keys. In the LCD window you now have access to 3
    options using the select keys.

    Look for an abbreviation
    resembling "ink pad level" . Here is where Held down the clear button
    for around 10 seconds. LCD must read "Press Power to Reset."
    ReadMore

    resetter for Canon MP198, MP258, MP276, MP496, MP558, MP568

    To everyone who required resetter for Canon MP198, MP258, MP276, MP496, MP558, MP568, and MP648 to reset ink counter on these canon printer model, I found how to reset these canon printers model on PrinterExperts.Blogspot.com. Canon MP198, MP258, MP276, MP496, MP558, MP568, and MP648 is canon all in one printer verison that designed for home and small office.


    I don’t know this reset method work or not on canon MP198, MP258, MP276, MP496, MP558, MP568, and MP648 because I don’t have this printer model to try this reset method.


    Ready to reset your printer, follow the following steps:

    All these steps must be done to reset your Canon MP198, MP258, MP276, MP496, MP558, MP568, and MP648 printer.

    A. Entering into service mode
    1. Turn off the printer off is the printer power on. And remove the printer USB cable from your computer..
    2. While the printer is OFF, press and hold the Start/Stop button on
      the some other canon printers model press Resume/Cancel button.
    3. While still holding Start/Stop button or Resume/Cancel button, press and hold the POWER button.
    4. When the POWER LED (green light) lit, release the Start/Stop or resume/cancel button (still holding the POWER button).
    5. Still holding the power button,   Press the Start/Stop button or
      resume/cancel button TWICE then Release the POWER button. Wait until LCD
      printer to display 0 (zero) number
    6. After the display is 0, attach the printer UDB cable to your
      computer, its will detected new device installed (its normal), now go to
      resetting steps


    B. Resetting Ink counter on the Printer


    1. Run “service_tool 1050.exe”. you can download the service tool software from this link: ServiceTool_1050.zip
    2. service tool 1050
    3. Confirm detected USB-port numbers on USB port column.
    4. Click “Main button” on Clear ink counter section. Make sure there
      are papers in the paper feed because the printer will print after the
      process is complete.
    5. Click “platen button” on the “Clear ink counter” section. The printer will print again.
    6. Turn off the printer and then turn the printer on. You printer is ready for use.
    ReadMore

    Monday, March 4, 2013

    reset a hp ink cartridge after refilling

    Go to the following website and download the freeware InkMonitor 2.1.2: http://www.pokluda.cz/.
    You have to add data about new cartridge. HP60 cartridge information =
    200 pages per cartridge. This works great for me. It gives you a history
    of everything printed. This way you can gauge when its time to refill
    your cartridges. You must refill before they run out of ink or you will
    burn out the print heads and have to replace them.

    The
    newer Hewlett Packard printers have included in the software that comes
    with their printers, a "toolbox" that includes a section called
    Estimated Ink Level. Its a great tool that allows you to keep track of
    how much ink is left in your cartridges so you don't start a big print
    job and get stranded out of ink in the middle of it. The only problem is
    that has become quite troublesome on those who wish to refill their
    cartridges. If you refill your cartridge or have someone else refill
    your cartridge, it will read as low or empty when you try to print with
    the cartridge.

     How does HP do it? They started embedding a serial number
    in the contact strip located on the back of the cartridge. The printer
    remembers that serial number and gives the message of low or out of ink.
    The internal memory is located in the printers firmware and is not in
    the software. It will remember the previous two cartridges ink level. We
    have posted various ways to reset the ink levels so your Estimated Ink
    Level will read full again. Click on your printer cartridge number below
    to find out how.
    ReadMore

    Could appears on HP DesignJets 800 Series, DesignJet 500 and 510.

    Could appears on HP DesignJets 800 Series, DesignJet 500 and 510.


    Printer show a System Error: 61:05


    The problem:


    That's an error Processing Job.

    This Error Code appears in these HP DesignJets with an HPGL/ 2 card
    installed, when processing either a PostScript or HP-GL/2 file.


    Solution 1:

    • Switch the Printer Off 
    • Wait a few minutes. 
    • Switch the Printer On 
    • Resend the file that you were trying to print. 


    Solution 2:

    • If the Error Code reappears, try to generate the file again and try to print again. 
    • If the file that is causing this error is PostScript, check if it is
      Binary. If the file is Binary, use AppleTalk to send the file to the
      Printer. 
    • If AppleTalk is not being used to send the Binary file to the
      Printer, you have to change the PostScript settings to Binary through
      the Front Panel (Set-up menu / PS settings / Encoding / Binary). 


    Solution 3:

    • If the Error Code continues to reappear, check for a new release of the Driver: http://www8.hp.com/us/en/support-drivers.html
    ReadMore

    Resetter Printer Epson L100 dan L200

    Epson Printer L100 and L200 are two types and models of printers that have similarities as well differences in each of which only a little different. Why is that sir? Obviously both types of printers are also differences that have similarities both in production by the alias equally Epson brand, also has the distinction between non-Plus scanner and scanner. You just live to select which one. But before choosing a printer would have to think before buying and this depends on your needs at home and at work respectively.


    Printer L100 and L200 are not the same as other printer types, where if you type another printer itself must be modified first by installing a drip tube in the outer regions printer I may say very at risk at all if you are not careful when installing and using it, which of course is very different from the second type of printer that has been designed and manufactured by the factory such that both direct Epson cartridge equal and IV tanks. So what if I buy one of these printers already were really safe from the damage that his name at any time? What if I buy a printer L100 or L200 no more bother researching such as the type and the other Epson models. the answer is to be researched as well as the other Epson printers as if had reached the maturity that has been determined by the provider of Epson.


    Download : Program Resetter Epson Stylus Photo L100 and L200

    Download : Driver Printer Epson L100

    Download : Driver Printer Epson L200

    Download : Driver Scanner L200


    The following description as well as tutorials and researching ways Printers Epson L100 and L200 with Software Resetter Epson official from the factory through a bit of writing and drawing or image.

    1. Turn the printer and connect the USB cable on your computer
    2. Double-click your AdjProg successful crack download
    3. Then do as the tutorial image below


    4. Then the last turn off the printer and then revived.

    5. Completed, and your printer is ready to operate again.
    ReadMore

    130 Roll loading instructions Hp designjet 130

    A FLASHING roll symbol means the roll is empty or a paper jam.

    130 Roll loading instructions…

    This section is only relevant if your printer has a roll feed installed.
    Only one source of paper can be used by the printer at any one time, so if a
    roll of paper is loaded and the software requests printing on a sheet
    of paper:
    • If you have a manual roll feed installed on your printer, you must unload the
    roll manually before you can print to a sheet of paper.
    • If you have the Automatic Roll Feed installed on your printer, the roll is
    automatically unloaded by the printer.
    In any case, the roll is automatically reloaded the next time printing to the roll is
    requested.
    You can cut a roll without unloading it by pressing the OK key (top right key on
    the front panel); the paper first advances about 1 cm or 0.4 inch.
    1. Set your application to pick paper from the roll feed (only applicable with
    the manual roll feed).
    2. Select Print from your application.
    3. Load a roll of the required paper onto the spindle. Ensure that the roll is the
    right way round with the surface on which you wish to print facing up and
    that the blue stop on the spindle is pushed in against the paper.
    4. Insert the spindle into its retaining slots, with the blue stop on the right and
    the black stop on the left as seen from the rear of the printer.
    If the paper is glossy, we recommend that you wear gloves to avoid
    smearing the surface of the paper.
    5. Make sure that the leading edge of the roll is straight and perpendicular to
    its side edges and has no irregularities.
    6. Rewind any excess paper so that the paper is rolled tightly onto the spindle.
    7. Insert the leading edge of the paper into the lower slot in the rear of the
    printer. Push the paper in until it encounters resistance, keeping the sides of
    the paper rolled tightly so that the paper is aligned properly. After emitting a
    ‘beep’, the printer will take up the paper.
    The printer will check the alignment of the paper.If the paper is
    properly aligned, the roll icon will appear on the display,
    indicating that the printer is ready to print.
    If the paper is misaligned, the printer will eject the paper and the
    display will show the misaligned and roll icons; you will have to
    reload the paper.
    8. Repeat Step 6, so that the paper is tightly rolled onto the spindle.
    Sheet paper
    Roll paper
    ReadMore

    Resolve The Error 912 - The computer has been removed in the HP Compaq dx2700 MT

    On the Desktop computer HP Compaq dx 2700, after opening the cover of
    CPU case (altough it has been closed back again), when starting the
    computer,  there will be the alarm tone sound is quite disturbing.

    And we must press the F1 key to continue loading the OS (Operating
    System). And this will continue on every time the computer is restarted.


    The warning is : error  912 - The computer has been removed. The machinecover has been removed

    since last system start up. please Ensure That any system access wasauthorized.


    To solve this problem:

    • Turn the computer on

    • Press F10 to enter the BIOS setup, wait for about 10 seconds

    • Find the Hardware Monitor Setup menu (use arrow keys), select then press enter

    • On Reset Case Open Status, change value  from Disable to Enable (use + on the numeric pad on the right side of the keyboard to change the value)


    • Press F10 to save the configuration, press Enter.
    source  h0w2.blogspot.com
    ReadMore

    Saturday, March 2, 2013

    Resetter Canon iP2770 v1074

    If you do not have a try Download Resetter Canon iP2770 v1074 are widely spread on the internet
     First into Service Mode iP2770:
     1. The printer is turned off and the power cord.
     2. Press the RESUME button two seconds
     then press the POWER button until the green light flash (when pressing the POWER button, ... RESUME button jgn removed first)
     3. Then release the Resume button, but do not release the button POWER.
     4. While the POWER button is still depressed, press the Resume button 5 times. Led will flash alternately orange last green with orange flames. (not to be mistaken 4x because the printer will die in total, but it is temporary too) Then ...
     5. Release both buttons simultaneously.
     6. Led will blink for a while then it will flash GREEN.
     7. The computer will detect the new device, ignore it .....
     8. This situation shows iP2770 printer in a state of SERVICE MODE and ready to reset.

     Then run Resetter iP2770 v1074 it:
     1. File Exctract Resetter iP2770.
     2. Prepare 2 paper in the printer (to print at the time of the reset process).
     3. Run the program Resetter iP2770
     4. Click "PLAY", then the printer will proceed, then the iP2770 will print a page with the words "D = 000.0"
     5. Click "EEPROM Clear".
     6. Then click "EEPROM", and the printer will print the results Resetter iP2770. One line in his writings as follows:
     "TPage (TTL = 00000)"
     7. Turn off the printer by pressing the POWER button.
     8. Done
    ReadMore

    HP LASERJET 1200 USER MANUAL eBook PDF

    User Manuals : HP LASERJET 1200 USER MANUAL - Download free eBook Hp Laserjet manual type 1200 in PDF file.
    User Manual pdf HP LASERJET 1200 :
    Printer HP LASERJET 1200 basics : Quick access to more information, Printer configuration, Walkaround, Printer control panel, Media paths, Printer connections, Printer software, Printer information page, Printer media considerations...
    Hp Laserjet 1200 user manual pdf
    Printing tasks : Manual feed, Canceling a print job, Understanding print quality settings, Optimizing print quality for media types, Guidelines for using media, Choosing paper and other media, Loading media into the input trays, Printing an envelope, Printing multiple envelopes, Printing on transparencies or labels, Printing on letterhead and preprinted forms, Printing on custom-size media and cardstock, Printing on both sides of the paper (manual two-sided printing), Printing multiple pages on a single sheet of paper (N-up printing), Printing booklets, Printing watermarks...

    HP LASERJET 1200 Maintenance : Cleaning the printer, Changing the pickup roller, Cleaning the pickup roller, Changing the printer separation pad, Redistributing toner, Changing the print cartridge...

    HP LASERJET 1200 Problem solving : Finding the solution, Status light patterns, Paper handling problems, Printed page is different than what appeared on screen, Printer software problems, Improving print quality, Clearing jams

    HP LASERJET 1200 Printer specifications : Environmental specifications, Power consumption, electrical specifications, and acoustic emissions, Physical specifications, Printer capacities and ratings, Memory specifications
     download - HP LASERJET 1200 USER MANUAL eBook PDF. We hope this HP LASERJET 1200 USER MANUAL.PDF can useful for you
    ReadMore

    Bypass the Microchips on Canon Inkjet Cartridges

    Careful Ravine machine models love a microchip that tells the machine how overmuch ink is socialist in the pickup as fountainhead as if the cartridge came direct from Canon. If you are using a refilled or aftermarket pickup in a Canon machine, the ink monitoring software testament solid the use of the pickup. There is, yet, a way to get around the monitoring software.

    Arise the instruction below :

    * Rotation on your Canon machine and inactivity for the warm-up transform to skilled. Give the printers way threshold and act for the pickup car to arrive to a exhaustive grab.

    * Withdraw the cartridge to be replaced and infix the refilled or aftermarket pickup. Intimate the machines make door.

    * Act for the printer to observe the new pickup. An incorrectness message will develop up on the choose to say the machine cannot notice the ink stage on the new cartridge.

    * Emit on "Yes" to inform that you requisite to use the new cartridge despite the attempt of hurt to the machine if the cartridge leaks.

    * Dawn on "Yes" one statesman time to respond that you understand Canon give not be responsible for casualty done to the machine by the new pickup.

    * Exhort and concord the "Resume" fix on the machine for at littlest phoebe seconds. The "Uphold" fasten faculty be flashing. If your printer does not hold the "Continue" fix, counsel and intermission the "Ok" or "Balance" add.

    * Use the machine as average, holding in purpose the ink monitoring software present not convey the ink steady for the new cartridge.
    ReadMore

    Friday, March 1, 2013

    HP Laserjet 4 and 4 plus series service mode

    1. Hold down the [On Line], [Form Feed], and [Enter] keys while powering ON the printer, until the ON LINE and FORM FEED indicators are both illuminated and the Display Window is blank. (If the Display Window reads 05 SELF TEST at this point, the keys were released too soon. Repeat this step until successful.)
    2. Press the [Form Feed] key, then the [Enter] key. The message SERVICE MODE is displayed briefly, then the printer automatically begins a 05 SELF TEST. After several seconds, the ON LINE and FORM FEED lights turn OFF.
    (The printer may display 02 WARMING UP if it has not warmed up completely.) After the printer has warmed up and passed the self test, SERVICE MODE is displayed.
    3. Press [Menus] once to display SERVICE MENU.
    4. Once it says SERVICE MENU press ITEM to scroll through service mode items.
    5. To exit the Service Mode press the [On Line] key.
    ReadMore

    Resetter Epson rx650 rar Free download

    http://rapidshare.com/files/97600913/Resetter_Epson_rx650.rar
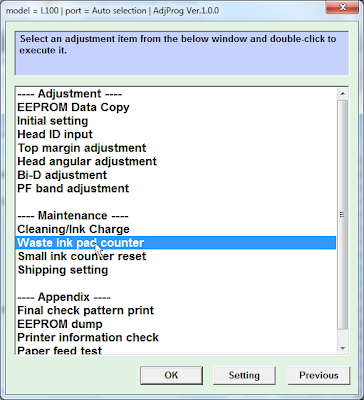
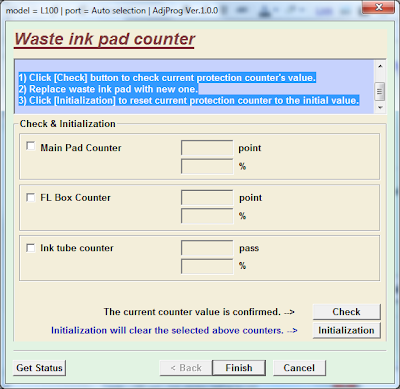
Here this step to use Resetter Printer Epson RX650

    1. Switch on printer
    2. Set the pc date setting to 13 february 2007
    3. Run adjprog.exe from the extracted folder
    4. Click accept
    5. Click particular adjustment mode
    6. Go to maintenance then Select waste ink pad counter then click ok
    7. Click on "check button till its done then click on initialization button then click on finish button
    8. Switch off printer for 5 secs then switch on again
    9. After you reset succesfully, you can change the date back to normal here
    ReadMore

    KM 2550 Error Code C6000

    Try this to reset:

    First open top cover then turn on power.
    press system menu/counter
    arrow down to service
    press and hold start, # then enter keys
    arrow down to maintenance
    press enter
    arrow down to Sim 163
    press enter
    select execute
    press enter
    turn off power then back on

    its cause fuser problem.
    ReadMore

    Samsung SCX Errors and Reset

    Samsung SCX series printers (SCX-4521, SCX-5530, SCX-6220, SCX-6320, SCX-6322) are piece of office equipments for use at home or in small business. These space-saving All-in-One printers provide high quality laser printing, high color digital scanning, copying and faxing.
    User can press “Menu” key on display to go through the menus and choices. There are many that are useful to the technicians. You can set the machine to continue copying if toner empty or to stop if toner empty. If you wish it to continue, go to “ignore toner empty” and set it to “ON”. Density, paper feed, power save, etc are also adjusted here. Go to “Reports” and then to “billing/Counters” for total count. You can also print out a report which will tell you all of the user choices and what their current setting is, which probably includes total count also.
    SCX 5530 Drum Reset:
    After replacing the drum with a new one, press “Menu” and then press up/down keys until “New Drum” displays. Then press “Mode/enter”. When you see “New drum unit?” press “1” to select yes and to reset the drum count.
    Error Messages:
    • Authentication failed: Wrong password
    • Comm Error, Connection Error: Fax line error problem
    • Data read/check USB: Time expired,; try again
    • Data write/ check USB: Inadequate memory
    • Door open: Front or rear cover open.
    • Enter again: Keystroke error
    • File access denied: Change server settings
    • File Name exist: Change file name
    • File name over limit: Delete some files
    • Fuser open
    • Incompatible: Problem with machine you are communicating with.
    • Low heat error: Off and On or fuser problem
    • LSU motor: Laser polygon motor problem

    ReadMore

    Printer Problems How to fix them

     In this article Im going to explain common printer problems and their solutions. Before we go into the details, following advance checks must be made. Check to see if:

    • The power supply voltage meets the specification.
    • The power supply is properly grounded
    • The printer shares the power supply with any other machine that draws large current intermittently (air conditioner, elevator etc).
    • The installation site is environmentally appropriate: high temperature, high humidity, direct sunlight, ventilation, etc.
    • Levelness of the installation site.
    • Correct paper is being used for printing.
    • The units, parts, and supplies used for printing (developer, PC drum, etc.) are properly replenished and replaced when they reach the end of their useful service life.
    • Toner is not running out.
    Printer problems can be divided into two categories:
    • Hardware Problems
    • Connectivity Problems
    To determine the problem type, print “status page” from the printer control panel. If it prints without any problem then problem is in the hardware. 

    Hardware Related Problems.

    Below is a list of common hardware problems. Printer troubleshooting, especially hardware repairing should always be done by a professional, however simple problems can be solved with very little efforts by end-user.
    • Incomplete Characters
    Incompletely printed characters on laser-printed transparencies be corrected by adjusting the print density. Always use recommended printing material to obtain good print quality.
    • Ghosting
    Ghost images appear on the printed page because of bad cleaning blade or improper charging of the drum unit. Ghost images appear on the next printed page if cleaning blade does not clean the drum surface. Drum/ photoconductor is very sensitive to light, so special care should taken while pulling it out.
    • Creased Pages
    Most common cause of paper creases is damp paper. If the creases are noticeable, replace the paper, if problem persists check all the potential causes of misfeeds, paper jams and skewed prints. No hardware solution exists for this problem. This is simply a side effect of the process.
    • Black Pages
    A broken charging unit causes a totally black page print. Try removing and reinstalling the print cartridge or photoconductor unit, the electrical contacts between the removable unit and the main part of the printer may not be connecting properly, otherwise replace the print cartridge/photoconductor unit with a new one.
    • Spotty Print
    If spots appear at regular intervals on the printout, the printer’s drum may be damaged or toner is stuck onto the fuser rollers. Try wiping off the fuser rollers. Check the drum for damage. If drum is damaged, you must get a new toner cartridge.
    • Vertical White Lines
    If you find you have white stripes throughout the printout, then the transfer corona wire is most likely the problem. There may be a problem getting the charge to the paper, resulting in toner missing on the page in areas. Otherwise there is blockage in the developer unit preventing a small area on the developer roller from receiving toner. Clean the path between the developing roller and the “doctor blade” with the corner of a sheet of paper if developing unit is user removable part, but this is not possible on printers using print cartridges.
    • Paper Jams
    A misfeed occurs if the printer fails to feed a sheet of paper from the paper feeder. Misfeeds are generally caused by paper which is unsuitable for the printer, either because it is too light, too heavy, or too smooth, however misfeeds do occur with the correct paper. Old or dirty feeding rollers may cause misfeeds. Clean the feeding roller rubber with water and cloth. 
    • Garbled or Corrupted output
    If you experience corrupted output, it is possible that the driver has gone corrupt or that you have wrong driver installed. One of the best ways to find out if you have a bad driver is to print a test page. To print a test page go to the "Control panel" in Windows, open "Printers and Faxes", Right click the printer, choose properties, and click "Print test page". If test page is not printed correctly than you should try to reinstall the driver.
    • Fuzzy Print
    Low quality or dump paper may effects sharpness of the printed image or the characters. The problem is not the printer, but the paper. Always store paper in a dry place to avoid this problem. Avoid paper that is too rough too smooth. Paper that’s too rough interferes with fusing of characters and their initial definition. If the paper is too smooth (like some coated papers, for example), it might feed improperly, causing distorted or overwritten characters.
    • Blank Printouts
    There are two main caused of blank printouts in inkjet printers:
      1. Low ink level
      2. Clogged nozzle of the ink cartridges
    If the ink is at an acceptable level, the nozzles have probably become clogged. To unclog the nozzle, dip a cotton swab in denatured alcohol and gently wipe away any dried ink. In laser printers a broken corotron wire may cause no print out.
    • Light Ghosting and Dark Ghosting
    A variety of problems can cause both light and dark ghosting, but the most common source of light ghosting is developer starvation. If you ask a laser printer to print an extremely dark or complex image, it can use up so much toner that the toner cartridge won’t be able to charge enough toner to print the next image. The proper solution is to use less toner by using low resolution, changing the pattern and printing a completely blank page prior to the page with the ghosting image.
    • Confetti Printouts
    Printouts with ink speckles, or confetti, always indicate an ink problem. Over time, ink can escape into the body of an inkjet printer, eventually finding its way onto subsequent printouts. To fix or prevent speckling, clean the insides of the printer with a damp cloth. Wrong Colors in Printouts Sometimes, a inkjet printers produce printing using the wrong color. Low ink may cause it, it the color cartridge are full than try to clean the nozzles with a cotton swab dipped in denatured alcohol.  
    Smudges on Printouts
    Smudges on printouts are most often caused by the user touching the printout before the ink has dried. So be aware of it. You may also face this if printer is dirty or nozzles are worn-out. You must replace the worn-out nozzles because they cant be repaired.

    Connectivity Related Problems:

    Before troubleshooting connectivity related problems, make sure that
    • Your printer is the selected printer in the Print dialog.
    • Select it from the Printer pop-up menu if you do not find it listed.
    • Take care that your operating software is up-to-date.
    • Ensure that you are using the manufacturers latest printer driver.
    • Try deleting and then re-adding your printer through the Printer Setup Utility.
    • Check the cable connections, line voltage etc.
    • The printer is "Online".
    • Wrong paper size selection in printer driver may also be a cause of print failure.
    • Printer and PC network cards should be able to communicate with each other to complete a print job. Check connectivity between both printer and PC. (see How to).
    • Spooling function saves the print job to hard disk of the printer in a queue eliminating delay in print jobs. Check the properties of the printer and ensure that spooling is enables.
    ReadMore